Guides · Building
How to build a media wall: design, frame, board and finish
A step-by-step guide to building a media wall from CLS timber and plasterboard, covering design, checking behind the wall, the frame, noggins, first fix, boarding and second fix, with a tools and materials list.
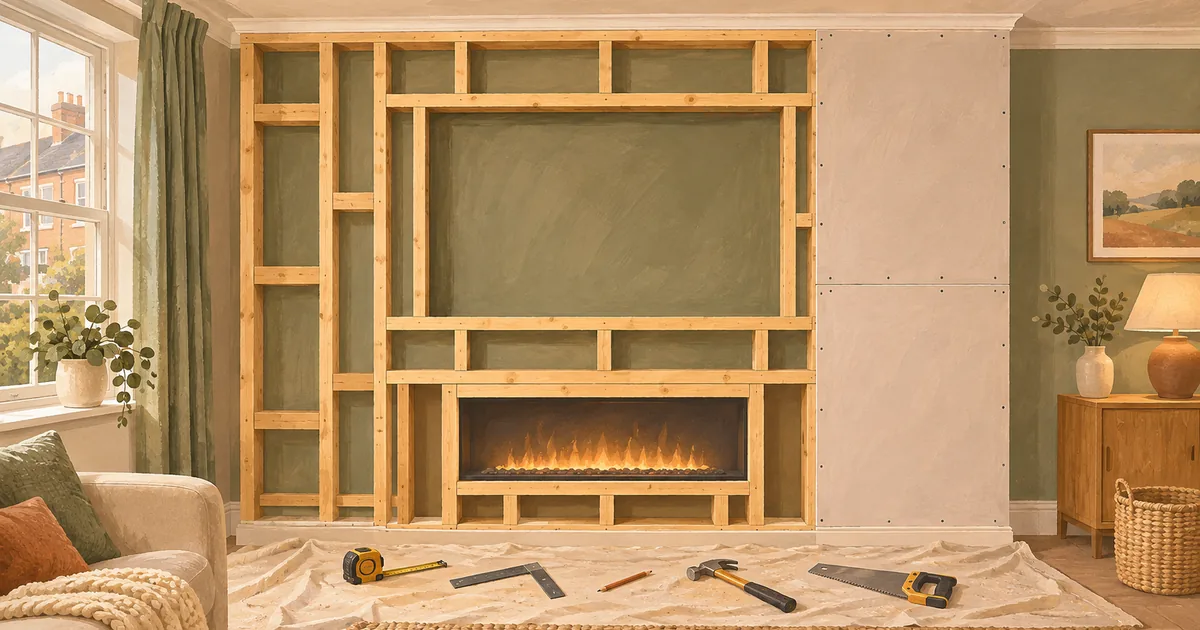
A media wall is a non-structural box of timber studs, faced with plasterboard, with a recess built to your fire's exact size. The work is well within reach of a confident DIYer, apart from the electrics, which should be planned with, and where needed done by, a registered electrician. This guide follows the order the job really runs in.
Indicative only. Always follow your fire's installation manual and your TV maker's instructions, and use a qualified electrician for new wiring.
1. Design it on paper first
Before you buy timber, draw the wall to scale with:
- the fire's recess (width, height, depth) from its installation manual;
- the TV's width and height from its spec sheet, and its centre height;
- the clearances from the fire's manual: base to floor, top to TV, distance to combustibles in front;
- shelves, alcoves, LED channels and socket positions;
- the overall width, height and depth of the frame.
The media wall planner gives you these numbers from your sizes, along with a rough materials list. Read what size fire for my TV and media wall depth and recess if you're still choosing.
Buy the fire (or at least get its manual) before you frame. Recess sizes differ by a few millimetres between models, and some openings are narrower than the fire itself because the fire's trim overlaps the board.
2. Check what's behind the wall
- Cables and pipes: use a detector such as the Franklin Sensors ProSensor M210, which is listed as finding studs and live wires, but treat it as a guide only. Electrical Safety First warns against drilling or screwing near hidden cables.
- Airbricks and vents: GOV.UK's damp and mould guidance says to keep airbricks clear. Don't seal one behind the frame.
- An old fireplace or flue: see media wall on a chimney breast.
- An external wall: read can you build a media wall on an external wall?
- Skirting and coving: decide whether to remove them where the frame sits.
3. Build the frame
Most media walls use CLS (Canadian Lumber Standard) timber. Screwfix's CLS guide lists 38 × 63 mm and 38 × 89 mm as common sizes. Wickes sells CLS 38 × 63 × 2400 mm (£3.50 on 15 November 2026) and CLS 38 × 89 × 2400 mm (£6.65).
A typical sequence:
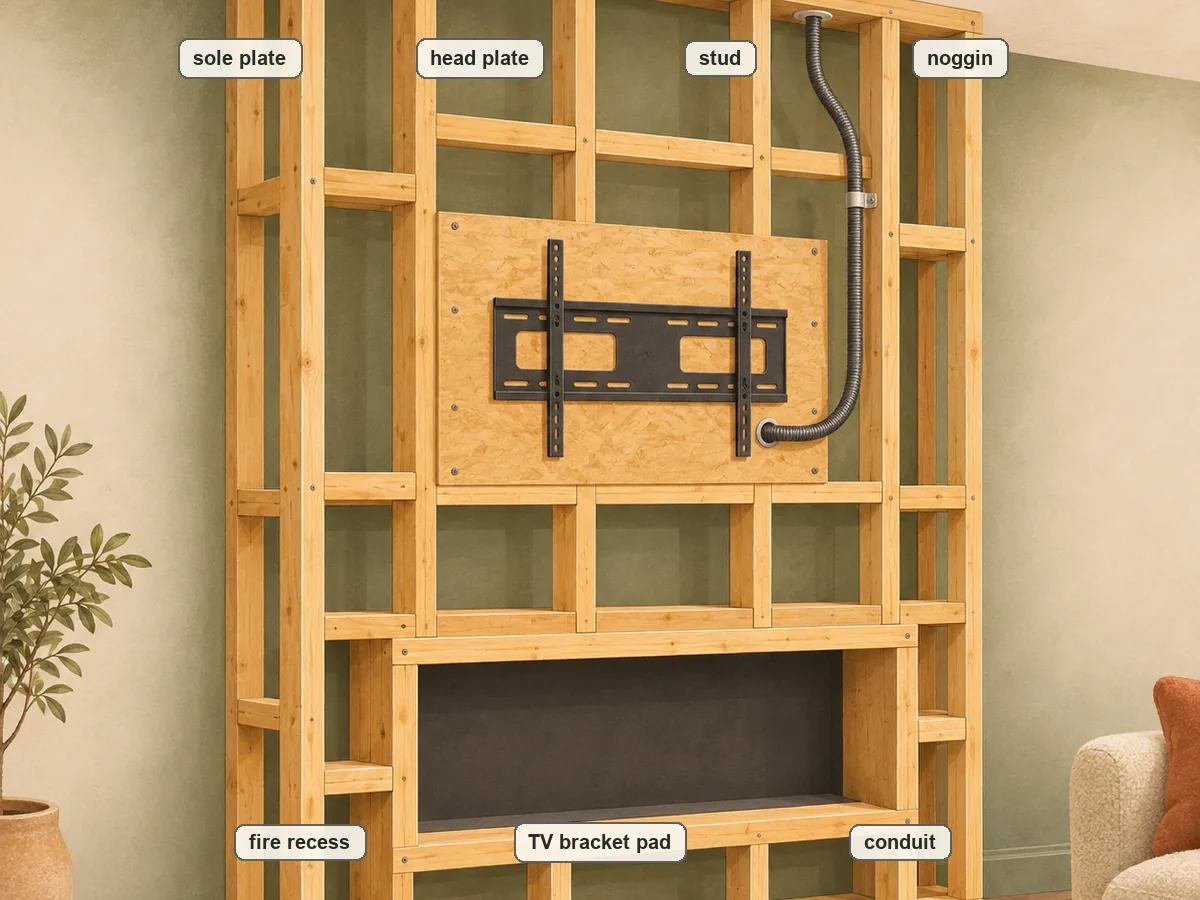
- Sole plate and head plate. Fix a bottom plate to the floor and a top plate to the ceiling joists, set out at the wall's front face. Use a laser level to get them plumb and aligned.
- Back frame or spacers. For a deep fire, build a second frame against the original wall, or fix short returns, so the front frame sits at the right depth.
- Studs. Fit vertical studs between the plates. A Siniat timber stud partition specification uses 38 × 63 mm studs at 600 mm centres, or 400 mm if the wall is to be tiled. Many media wall builders use 400 mm anyway for a stiffer face.
- The fire recess. Frame the opening to the manual's exact width, height and depth, with the base at or above the manual's minimum height from the floor (Econovex, for example, asks for at least 150 mm). Gazco's eReflex manual says the fire "must be installed in a purpose built studwork enclosure"; Econovex says non-load-bearing walls only. Build the recess so the fire carries no load.
- Noggins. Add horizontal timbers between studs at every board edge, at each shelf height, behind the TV bracket position and wherever a socket box or cladding fixing will go.
For framing screws, Wickes lists Spax 5 × 80 mm countersunk screws (£17.25 for 100 on 15 November 2026). Use fixings suited to your floor, ceiling and walls.
4. First fix
Before any board goes on:
- your electrician runs the cables for the fire's socket or spur, the TV socket, the AV shelf and the LED drivers (see media wall electrics);
- you run flexible conduit with a draw cord for HDMI and other low-voltage cables. Wickes lists 20 mm × 5 m flexible conduit at £7;
- take photos and measurements of every cable and noggin, for later.
5. Board it
Standard 12.5 mm plasterboard comes in 2400 × 1200 mm sheets. Wickes listed Knauf square-edge board at £13.40 and Knauf tapered-edge board at £12.40 on 15 November 2026. Tapered edge suits taping and jointing; square edge suits a plaster skim. See media wall finishes. To estimate sheets, use Plankley's plasterboard calculator.
- The Siniat specification above fixes 12.5 mm board with 38 mm screws at 300 mm centres. MKM's plasterboard guide also gives 300 mm as a typical maximum along studs.
- Siniat's screw guidance says drywall screws need at least 25 mm penetration into timber.
- Wickes listed 38 mm fine-thread plasterboard screws, 200-pack at £6.80, and Amazon UK lists ForgeFix 3.5 × 38 mm coarse-thread drywall screws, box of 200.
- Cut socket and brush-plate holes with a drywall saw such as the Bahco PC6DRY or a Stanley FatMax jab saw.
- Line the fire recess as its manual says. Some manuals call for specific boards; British Fires, for example, requires non-combustible board on any overhang above its New Forest fire.
6. Finish
Tape and joint or skim, let it dry, then mist coat and paint. Fit any slat panels or cladding after that, keeping them out of the fire's clearance zone. See finishes and panelling and LED lighting.
7. Second fix
- The electrician fits the sockets and spurs, and tests and certifies the work where required.
- Slide the fire in and connect it exactly as the manual says. Check that the heater's air outlets are clear.
- Fit the TV bracket into the pad you framed. See TV brackets for media walls.
- Pull HDMI cables through the conduit and fit the LED strips.
Screwfix's own how to build a media wall guide is a useful second read.
Tools and materials checklist
- CLS timber, framing screws and suitable wall, floor and ceiling fixings
- 12.5 mm plasterboard (plus any special boards your fire's manual specifies), drywall screws, jointing tape and compound, or a plasterer for a skim
- Flexible conduit, draw cord, brush plates
- Stud and cable detector, laser level, mitre or circular saw, drill driver, drywall saw, tape measure, spirit level
- PPE: safety glasses, a dust mask for cutting board, gloves
For costs, see media wall cost UK.
Sources
Opened and checked on 15 November 2026.
- screwfix.com/guides/building-doors/carpentry-timber/cls-timber-sizes-explained
- source.thenbs.com/en/gb/product/siniat-non-loadbearing-timber-stud-partition-ts63x38-12f-25g/aKjj2KY6wMmHVUkDU892W3/mqEkKHtPxAcgNfMQ8WVirk
- siniat.helpjuice.com/fixings/what-screw-shall-i-use-for-fixing-into-timber
- mkm.com/blog/advice-and-reviews/how-to-install-plasterboard
- electricalsafetyfirst.org.uk/safety-advice/home-and-people/diy-ers/
- gov.uk/government/publications/damp-and-mould-understanding-and-addressing-the-health-risks-for-rented-housing-providers/understanding-and-addressing-the-health-risks-of-damp-and-mould-in-the-home--2
- econovexfires.co.uk/wp-content/uploads/2026/10/econovex-owners-manual-3-sided-deep-and-slimline.pdf
- stovax.com/download/Technical%20Documents/2.%20Fires/Built%20In%20&%20Wall%20Mounted%20Fires/Electric/eReflex%20Mk2/eReflex%20Range%20Instructions.pdf
- plankley.co.uk/calculators/plasterboard/
- screwfix.com/guides/building-doors/home-improvements/how-to-build-a-media-wall